Pop Up Redo Part 2!

It has been awhile since we last blogged but that does not mean we haven’t been working on the house/ pop up! We have been quite busy, but just forgetting or not having time to blog!

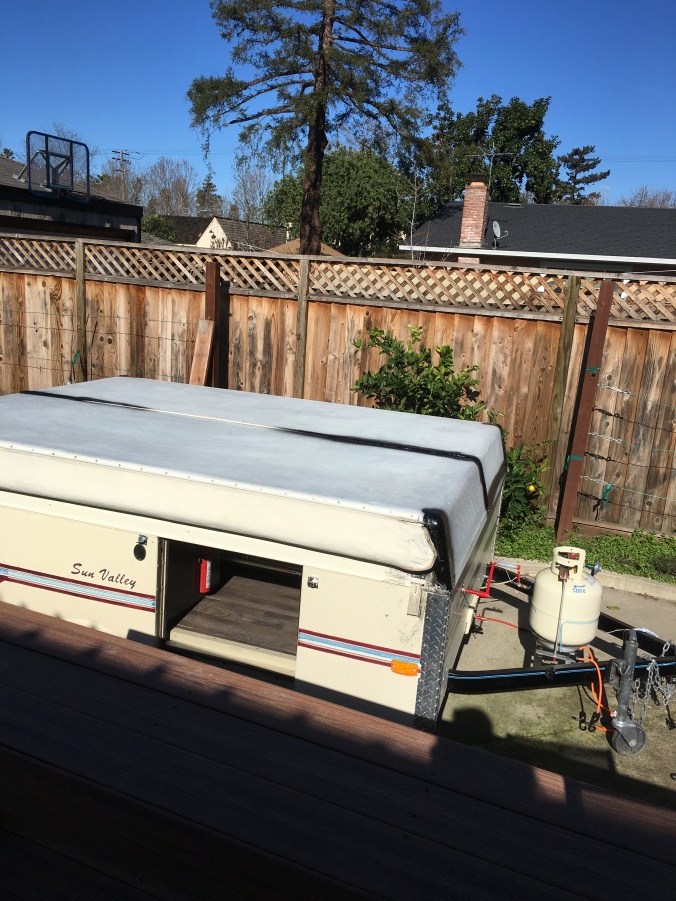
Our last post was all about how we bought a used pop up camper on Craigslist in January 2017.  We worked on it bit before taking it on its maiden voyage to Joshua Tree, Sedona, and Scottsdale.  Since then we have continued to work on it and improve the old 1987 Coleman.

IMG_0283

The counters were a beige laminate and we didn’t want to spend much money on them so we used a tip from PopUpPrincess website and used a thick peel and stick contact paper that looks like Carrara Marble.  Then we bought new white edging instead of the old yellow-ish beige.  Over all it looks pretty good! A few bubble but not bad for our first go at it.

We also took down the old dusty blue curtains and made new ones.  We took another tip from PopUpPrincess website and used painter’s drop clothes which are pretty cheap at a hardware store.  I cut the drop clothes to the sizes I needed to cover the windows and bed areas.  I had to piece together some pieces of drop cloth to make the right sizes but I like the way it looks.  The trickiest part was figuring out how to attach the curtains to the small rails that are in the pop up.  The old curtains had these plastic tabs that slid in the track but they were thick plastic that I didn’t think my sewing machine could sew through.  So I cut the strip with the tabs off the old curtains and just sewed that strip of fabric to the top of the new curtains.  Worked like a charm!

Then I painted the curtains in a strip pattern that mimics a Pendleton blanket to give the pop up a vintage rustic feel.  I also got this idea from someone else’s redo on PopUpPrincess.  Imitation is the greatest form of flattery right?  I love the way they turned out.  They give the pop up privacy and some color at the same time.

Next we bought the pop up new tires because when we were taking it to Lake Nacimiento for Labor Day we got a flat tire on the hottest day of the year in Paso Robles! It was 118 degrees according to my Instagram stories temp.  Ahh! Luckily we got the tire off and replaced it with spare which got us to the lake but once we got there we took off both tires and put it up on blocks and left it at the lake all closed up.  We took the original 1987 wheels home and bought brand new ones online.  I guess wheels reach their limit after 30 years. 🙂 We are lucky they didn’t go out on us while we were super far away in Arizona! When we went back up to the lake in fall we brought the new wheels put them on and drove the pop up back with us.  It was so great to have the option to leave the pop up there and not have to drive home on the old spare.  We even got our new spare a cover, to keep it nice! 🙂

We also bought some new read Coleman logos online since we covered up the old ones with paint.  The look pretty good!

Next on the list was cleaning a stain on the canvas which took cleaner and lot of scrubbing. Then we tackled the ceiling.  Since the ceiling was uneven from the water damage we needed something to cover it up.  We tried painting but the uneven-ness was still very apparent.  Then we tried peel and stick flooring but that wouldn’t hold with the force of gravity acting against it, so we went back to the drawing board.  The idea we came up with was to cover the ceiling with decoupaged paper collage. Since we travel in the pop up we decided to use cut up pieces of maps to cover the ceiling.  We went to AAA and got some maps (Thanks, AAA) and cut them up into different size triangles.  Then we used Modge Podge to coat it and stick it to the ceiling.  It took awhile and another trip to AAA for more maps 😉 but we got it done and we love the way it looks! It covers the uneven-ness and adds color! Plus we can look for places we have been or want to go to!

IMG_6477

Lastly, we added a cute sign that my mom got for us to the door using Command 3M adhesive velcro strips.  Since our first trip we have been to Santa Rosa and Lake Nacimiento.  This year we have a trip planned with the pop up to go to Zion National Park and Bryce Canyon National Park, can’t wait!

-Laurel

Home Sweet…Pop Up?

You guessed it…we bought an old pop-up camper trailer! I guess we thought we didn’t have enough to do with the house (yeah right!).  Todd and I had been tossing around the idea of a pop up, so we could take it camping and take it to Lake Nacimiento with Todd’s family because the house is getting tight.  Then I saw ideas on Pinterest of how people had fixed up old trailers to look amazing and I needed one yesterday.  See what I mean!?

We looked on Craigslist and were interested in a few with no returned emails.  Finally we found one in our budget in the area and jumped on it right after Christmas. We bought the pop up in Willow Glen and brought it home the same day. Good thing we already had a trailer hitch on our car! Meet our 1987 Coleman Sun Valley Pop Up!


When we bought the pop up it has a leak in the roof and of course a huge storm was on the way so we closed it up, covered it with a tarp and about 100 bungee cords, and hoped for the best.   After all the rain we opened it up to quite a bit of leaking in the ceiling of the interior. So we tore off as much of the ceiling as we could and let it dry for a few days. Then we did our research. We found that Pop Up Portal and Pop Up Princess are great resources for learning what you need to know about pop up remodeling.

We bought the materials we needed to seal the outside of the pop up and make it water tight again. The recommended material to seal the outside was truck bed liner paint, which is very toxic. So we bought the truck bed liner paint, special rollers, and a respirator. Luckily, you can buy truck bed liner in whichever color you want. We went for a dark charcoal grey.


While we waited for the truck bed liner paint to come we started on other projects when there was no rain to contend with! While Todd was away at a teaching conference I decided to surprise him by getting as much done on the pop up as possible. I started by priming all the cabinetry and ceiling with a sealing primer that sticks to laminate. After a coat of primer I painted all the cabinetry a nice grey color and which took 2 ½ coats. Then I started on the floors. For the floors I bought a peel and stick vinyl floor that looks like weathered wood and comes in plank pieces. This was so easy to do and only cost about $40! I love the way it turned out! Next, I replaced the knobs and drawer pulls with something that wasn’t made of plastic, a nice black iron look. Thanks to my parents for helping me get the floors in! Todd was very surprised when he got home!

IMG_0102

Next up Todd needed to fix the leak in the roof. He donned his respirator and got to work! Man, that stuff is so stinky I couldn’t even be outside when he was painting it! I had to close all the windows and Todd worked as quick as he could. The truck bed liner was very sticky and toxic, so much so it ate away at the roller material and it said you could not use plastic paint tray liners because it would eat a whole through it! Todd worked as quick as he could! Afterward we coloring matched the truck bed liner and painted the bottom half of the pop up. It still needs another coat and we want to paint a red and white stripe and get some new Coleman logos to put where the old ones were.

With the pop up sealed we felt like it was safe to take it on a trip! This gave us a hard deadline to get as much done as possible! Next up was to recover the table cushions. My mom found some great fabric online of all places and it was a great price. We crossed our fingers that it would be what we were looking for and bought it! When it came I was so excited because the print was great and it was nice a thick, which is necessary when reupholstering cushions.

Recovering the cushions was easy because they had a wood backing that I could staple gun. All four cushions took less than a half an hour! We still have a ton more to do on the pop up but Todd and I had a great time taking it on it’s first trip. We decided to be adventurous and the pop up’s first trip was a week long adventure to Joshua Tree National Park, Sedona, and Spring Training in Scottsdale! It worked our great and was so much cheaper than flights and hotels. We can’t wait to fix it up more and take it on more adventures!

-Laurel


Dining Room Re-Do!

Our dining room was a hodge podge of items that looked fine, but lacked cohesiveness.  We had a dining set that we loved because it belonged to Todd’s great grandmother but….it was definitely showing its age.  It was covered in scratch marks, heat and water stains and two of the chairs were broken and unusable because they were missing part of the back.  With our budget, our option was to paint it, luckily Todd’s mom didn’t want to see it painted and offered to pay to have it refinished. Yay!

We found a refurbisher online and brought it to him.  He worked out of his house and did a great job! He even had us come over to see different stain options and choose which one we liked best! His Yelp page is located here.

He even had a “guy” who repaired the broken chair pieces and we couldn’t even tell which ones were fixed when we got them back.  We love the new stain and how clean, polished, and smooth the new finish is.  Thanks Marty for your great work and thanks Tammy for funding the preservation of a family heirloom.

Once we got the newly refinished chairs, table, and buffet home we needed to recover the chairs.  Todd and I headed to one of the only fabric stores left in the area and searched for a fabric that went with out color scheme and was the right thickness.  It took a while to find one that was in stock and not special order and was also not a million dollars, but we found one! Once we got home I got to work with scissors and my trusty staple gun! Recovering the chairs was simple and the whole process took less than an hour!

We love the new look of the dining set and feel we are now honoring this family heirloom. After we redid the dining set we wanted the room itself to have more character.  We decided to add this to the room by building our own built ins around the cased opening from the dining room to the living room.  That wall was already a feature wall that was painted a peacock teal and we we inspired by this re-do we found on Young House Love that showed a dark color through the shelves.  They started with built ins and just painted the backs but we started with a painted wall and had to build the built ins!

We found a tutorial on how to use IKEA cabinets to make built ins and were sold!  We headed to Palo Alto with our measurements and a long list.  A few hours and many distractions later we barely fit everything into the car and made it home! I even had to sit in the back seat behind Todd because the boxes were so long they went all the way to the front seat.

The supplies rested in the garage for a few months before we had time to tackle this project in the fall.  First, we started by figuring out where we needed to cut the prefab cabinets and then Todd got to work on the table saw and afterward built the cabinet frames.

img_8662

Once Todd built the frames we had to figure out how to make them look built in! Todd took off the baseboards (being careful to save as much as he could to reuse). Then we attached them to the wall and started to figure out the top shelves that went over the cased opening.  This part gave us a run for our money.

We had to cover the shelves on the top with some backer board and we added some trim in a Shaker design (my favorite part).  Then we had to caulk the edges to make them look built in.  To make the top look built in Todd added crown moulding to the room with the help of my dad.  Thanks Papa!

Last, we gave the crown moulding, baseboards, and shelves 2-3 coats of white paint to crisp them up and then added all kinds of fun knick knacks and momentos to personalize the shelves!

IMG_6181

We also added some art work to the opposite wall including an art print of our favorite coffee shop in Chico, CA where went to college called Naked Coffee Lounge.  We are still working on our gallery wall over the buffet but we have a good start with some monograms and a picture from our wedding! What do you think of the shelves? We love the look and the bonus of more storage!

Next on our list of projects is one we have been pushing back, because its kind of a monster. We’ll start building a new garage in the next few weeks…ahhh! Help!

-Laurel

It’s Been Awhile.

It has been 10 months since we last blogged! Whoops! Life has gotten busy and the project have gotten smaller! 🙂  Here is a compilation of the projects we have done since last November.

  1. Hanging/ Sliding “Barn” Door to Office.  We took the regular hollow core door off the frame to enter the office which is right off the living room and had a empty hole for quite some time.  Then we took one of the doors we had removed from the workshop we tore down and got it ready to hang.  The doors have already had some work to them (see here) but were still not ready.  The doors were a beautiful teal color, extra tall, and four panel, but someone had nailed and glued particle board to one side of them that was impossible to take off! Many hands and many hours of prying and scraping went into saving a repurposing these doors.

    Once the particle board and its glue was off we puttied one side to fill in all the gouges.  Then we washed it with a TSP and hot water solution (many times).  After it dried, we waxed and buffed it with furniture wax and the door was ready. Now we needed to get all the parts and gear to hang the door.   We looked into buying a barn door kit, but they were all about $300, no thanks.  Then I found a DIY tutorial of another couple who had made their own using mostly garage door parts and spray paint.   They had me at spray paint! We ordered all the supplies and made a few trips to the hardware store and had all the stuff we needed.  Here is link to the tutorial we used here.  We thought we paid great attention but still messed up a few times.  In the end we were able to hang the door safely and it slides great! We love the teal color that was originally on the door and we even bought a vintage door plate and door knob from a local antique store to top it off!

    img_8683

  2. Update of trunk entertainment center.  We bought an old trunk at a yard sale years ago and have been saving it to be our entertainment center.  We loved the way it looked and had it set up for while before we got around to updating it.  As you can see below it was a little too shabby and not enough chic.  I painted the fabric interior with leftover paint from the walls to freshen it up.  The Todd and I removed the front of the drawer for the top shelf to put our cable receiver and Apple TV in.  We drilled holes out the back for the cords to go through so we wouldn’t see them.  Then we removed the front of the second drawer and put it back on with a piano bench hinge .  It flips down to reveal the other electronic elements that don’t need to be open to get a remote signal such as the router and time machine.  Again we drilled a large space out the back for cords and to give the boxes air flow so they don’t over heat.  The drawer front closes with a magnet closure so it doesn’t fall down on its own.

    img_8660

    We love the new clean look and really love that the cords are out of the way and electronics are off the top of the trunk!

3. Myka’s Yard Fence Re-Do.  Well when we first got Myka the fence and gate Todd made that were about hip height worked perfectly.  Then Myka grew and learned how to jump the fence and jump on the top of her dog house too!  So Todd had to add lattice to the top of the fence and gate so that little, I mean big rascal can’t get out!


4.  Todd Built Us a Bed!  For my wedding present Todd said he was going to build me something.  Well 2.5 years later, he did! He let me find plans for a bed I liked online and then he built it all by himself! I love it and I am so impressed.  It is a look alike to a bed West Elm sells but I like this one way better.  Mine has lights built in and custom colors to match our decor.  Thank you Todd!

img_8679

Lastly, we have been enjoying our home with family and friends! I should have a new post up about our dining room soon!

-Laurel

Office, Hallway, and Bedroom Improvements

Our office which is really the front bedroom has been a mess since we moved in.  We had already done the desk but needed the rest of the room to come together.  We were in luck one day when we were going to Emi and Tony’s house.  As we were parking we saw a large white cabinet with glass doors on the curb across the street from their house.  We thought it looked way too nice to be one the curb for free, so we knocked on the door and asked.  They said that it was free!  Score!

photo 3

We brought it over to Emi and Tony’s garage and they delivered it in their big car later!  As I was putting things inside the cabinet I needed a place to put our files, so we bought some plaice file boxes to put on the bottom shelves.  The downside is that they were not nice to look at through the glass windows.  Time to get creative, so I got some pretty paper at the craft store and used some white card stock to create a screen to tape into the glass from the inside.  Then we added a few green and beige boxes from Home Depot and Voila! A great storage piece for the office.

photo 4

We were also very lucky that Todd’s cousin Jenyce gave us her chair that she no longer needed in her house.  It fit perfectly in the corner for reading or working on your laptop.  I needed a small table to put beside and I had a stool with no place to go, but it was a bright turquoise color.  So, I used one of my favorite tools…spray paint!  I had a can of light green spray paint so in a few minutes the stool was the perfect color to go with the chair and an extra floor lamp that we had!  Thanks Jenyce!

photo 2

Above the desk that I refurbished over the summer was a big blank wall and it needed something.  We were lucky enough to receive some large old school maps from our friend, Bonnie.  We love them and have a special place in our hearts for anything school related and add to it that they are vintage…a big win!  The maps were from a set that would hang in front of the chalk board in a San Jose State classroom from the 1950s.  So cool!  We took one of the maps Todd made a frame for it out of some cheap 1 x 3s and his handy dandy nail gun.  Then we burned the wood with a torch and sealed it with a clear coat.  Todd attached the map to the frame and hung it on the wall over the desk!  I think it looks great!  Thanks Bonnie!

Image Image 1 Image 2 Image 3

Overall, we love the way the office looks now, if only we could keep it clean!  😉

Next, was a small project for the armoire in our bedroom.  We bought it at an estate sale for $125 and it fits great in our room!  One of the only things that we didn’t like was the cutouts that had an orange fabric on the inside.  We have no orange in our room and it just didn’t work.  So, I went to the craft store and bought two sheet of scrap book paper that went with the bedroom.  Then I ripped the orange fabric off, which was harder than I thought it would be.  Last I duct taped the paper from the inside.  Yes, I said duct taped because who cares, no one will see the inside of the a moire, it was hard for me to see when I bent around and taped it.  🙂

photo 5

Before: Orange

photo 1-1

After: Light green and white paisley paper.

One of my favorite things to show people when they come over is the new linen closet, which I know sounds odd.  When we bought the house it did not have a linen closet at all.  We were able to add one when we redid the layout and added a small hallway.  See the post about the bathrooms for more detail on that! Well the door to our new linen closet is not new at all.  In fact it is original to the property.  Our property had many outbuildings when we bought it in the backyard.  One of them was a workshop and it had an old door that went to a tiny 1.5 foot wide side yard.  We saved the door and used it for the linen closet.

IMG_6087IMG_6099IMG_6111IMG_6085

First, it had to be made to the right size.  The door was a bit too wide for out opening and Todd and my dad cut in on the table saw to be the right width.  Then the door was a few inches too short for the new opening, so they used part of the piece they just cut off and attached it to the bottom of the door.  Next we sanded and puttied and sanded and puttied and sanded and puttied until the door was some what smooth and you can’t even tell where the piece was attached any more!  Next, we painted it but only on the wide you see in the hall way.  We decided to leave it original on the inside to show it’s age.   Then Todd had the hard task on chipping away the spots for the hinges on the door frame and hanging the door.  He did and great job!  Lastly, we put the original door knob and hardware back on and we love the end result!

11084328_10100732774201720_2065767270_n IMG_6240

-Laurel

A Little Work for the Outside of the House!

The garage at our new house is detached and well… needs a bit of love.  Scratch that, A LOT of love!  When it rains it holds out water like a colander!  We found this out the hard way when our kitchen was being done and water rained all over our brand new appliances that we were storing in there.  😦  Fortunately, we were able to dry them out and they all worked!!

To try and fix this issue my brother in law, Tony had a great idea of how to cover the roof with a tarp with minimal weight being placed on the the sketchy roof.  We had extra long PVC pipes leftover from when we put in irrigation and zip ties.  Tony had the idea to zip tie two corners of the tarp to two pipes and while holding it up high walk the tarp into position.  Then from the sides they could secure the tarp down.  The roof keeps out water much better now and when it rains only one corner of the garage gets wet.  Hopefully this fix can tie us over until we are ready to do a garage overhaul.

IMG_5860 IMG_5854

Over the summer we were able to find three matching  outdoor lights at a garage sale for $15!  They were the style we wanted for the house but not the color.  We took them to our home at the time and fixed them up.

IMG_2705 IMG_2706

First, we took out all the panes of glass and washed them in very hot soapy water.  This made a huge difference.  After wiping down the metal frames on the lights we spray painted them with numerous light coats of high heat matte black spray paint.

IMG_2704 IMG_2709 IMG_2708

Then the panes of glass went back in.  We love the end result.  The finish matches the house and so does the style.  We have installed two at the house so far.  One on the front porch and one out the backdoor.  More posts to come soon!light

-Laurel

Furniture Redo

Here are some furniture projects we have done lately.

Project #1

While the weather was still nice we tackled a few more furniture projects for the new house. Over the summer we went to an estate sale in the area and found awesome library files for the old Dewey Decimal system cards. I saw them and thought those would make a good coffee table. We got them for a steal and bought two to make a large coffee table and Emi and Tony bought one for a future project as well.

old library file

Here is what they looked like before.

Once we got them to the house we discussed how to give them a top. We ended up buying a large solid piece of pine at Home Depot and cutting a piece to cover the top of each library file with a little lip. The library files had little copper tubes plugs on the top corners to help them stack, so we had to make the same sized holes in the bottom of our table top so they would fit snugly. This brought in the drill and some very careful drilling.

IMG_2166

Unfinished Top

IMG_2165

Drilling Time!

My mom and I worked together and fitted the tops and then moved onto painting the top and staining the old library files. We painted many coats of grey and clear sealer to finish the top. Then I added wheels to the bottom so the table would be at the right height and be easy to move.

IMG_2193

Painting the Tops

We intend of using them pushed together to make a big square. To keep them from coming apart we think we are going to use a clasp like the one below. We decided to wait until we use them for awhile to see if we need the clasps or not.

IMG_2164

Clasp or no clasp.

Here is the finished project!

IMG_2203

IMG_2202

Project #2

A desk! Our friend Molly had nice solid wood desk that had been in her house for years. It was originally a mahogany finish and had a top that had been damaged. Molly did not need it anymore and asked if we wanted it. Um…Yes Please! She even delivered it! Wow!

Once the desk was at our house we glued as much of the top back down as we could with wood glue and clamps. Then we sanded and sanded and sanded down the top. After this It tried to paint it with some white paint I had but for some reason the paint was not sticking and was just getting super clumpy and rough looking. My mom and I think it was because under the polyurethane layer that I sanded off it was oiled and the oil did not like the paint.

We had heard of this magical paint called Annie Sloan Chalk Paint that was supposed to stick to anything without sanding. It is even supposed to work on leather and fabric. We had looked into it before but it is hard to find and pretty pricey. Since we were so frustrated by the paint not sticking we looked up to see where the expensive chalk paint was sold.

IMG_2393

We found out it was sold at a shop in Downtown Willow Glen not far from our house. My mom and I hopped in the car and headed over. It was pricey, but when your usual tactics have not worked it is time to pull out the big guns. We bought the paint and wax and headed back to the house. The lady at the shop said since the oil was bleeding through the paint we should try spraying a matte clear spray paint on it first to seal in the oil before using the chalk paint. I already had the spray paint from the coffee table and it worked like a charm.

A few days later I painted white on the body of the desk white and the top grey. Then I waxed it with a rag the next day and voila! Here is the finished desk! Thanks Molly! Sorry I have no before pictures, I forgot this time !

IMG_2392

IMG_2394

A little off topic but when garage sale-ing (is that a verb?) over the summer I found this amazing deal! All the tools below for….$10! Who is the best wife ever? 🙂

IMG_2361

Until next time,
Laurel